Thursday, August 6, 2015

Titration 14

Today was a very bittersweet day in the lab. It was, unfortunately, the very last lab that the probe buddies will ever do together in Chem Honors, CTD, 2k15. However, this is also the first day that Ameera and I ever finished before everyone else, and we actually collected accurate data that was very close to the expected data for once too! We were very proud.

Here is a photo of our burette to the left. As you can see, it is a very long structure that made it beneficial to be so tall, so I could pour our strong base, NaOH, into the top, as you can see to the right. After the initial #basic rinse of the burette, I filled it until there were exactly 50 mL in the long tube. Next, we placed our beaker filled with 8 mL of the acetic acid of vinegar underneath the burette, so it was ready to catch the drops of base as they slowly dripped down. We added around 20 mL of distilled water to the vinegar as well, so that the acid and base reactions would be clearer to see. We added several drops of phenolphthalein (pH) to the flask that would turn pink with each drop until reaching the perfect pale pink color that would indicate the acid and base had reached the equivalence point. We also added a magnetic stirring device that could stir our solution using magnets in the hot plate. Finally, the probe buddies were ready to begin our first trial!

It was painstakingly difficult and very stressful to watch the base NaOH slowly drip into the acetic acid. If even a single drop of base too much were added, the equilibrium reached would disappear and the solution would suddenly became very #basic, as indicated by an extreme dark pink. Unfortunately, we obtained this result from our first trial. Apparently, 25.5 mL of NaOH was just a tad too much. :( So close, so far.


the unfortunate result of our first trial..
Lucky, Ameera and I were ready to succeed in the second trial! This time, we used 7.5 mL of vinegar, and we added the drops of NaOH more carefully. After much stress and minor screaming, we obtained this beautiful, pale pink of equilibrium! This time, we used exactly 25.6 mL of NaOH, and hit the sweet spot. 


We calculated the percent ionization of vinegar as follows....


[H3O^+] / [CH3COOH] x 100 = percent ionization

.00398 / [.83] x 100 = 47.96%

The percent ionization is such a low number because acetic acid is a very weak acid, and weak acids do not ionize fully with strong bases. A stronger acid, like perhaps HCl, would have had a much higher percent ionization. However, even though vinegar is a weak acid, it still has just as much potential to equalize a base.


probe forever

A Guided Inquiry Lab 13B


Today's lab was a very fun exploration of what we had learned today involving solubility, solutions, solvents, and solutes. A solute is the lesser amount of a substance in a solution, while a solvent is the greater substance. Solubility is the measure of the amount of salute that will dissolve in a in amount of solvent - usually water. We were given an unknown ionic compound of salt that could either be NaCl, NaNO3, or KNO3. However, no laboratory procedure was given to us, so Ameera and I (aka probe buddies) had to figure out the unknown salt by ourselves using our own knowledge of all the 's' words and the solubility curve graph.

After some deliberation, Ameera and I came up with an action plan. We decided to heat up water in a beaker until the temperature reached exactly 44 degrees Celsius, and then we would pour approximately 6 grams of salt into the solvent and see what would happen. We chose these precise numbers because the combination of these two points on the graph is equidistant from NaCl, NaNO3, and KNO3, so if the salt dissolved or not we would have a clearer idea of which of the three substances it was.

To start, we measured the mass of our salt in the mini beaker on a balance, and then massed the mini beaker and used subtraction to found the mass of the salt to be 18.98 grams. Then we measured 10 mL of water into another mini beaker, because we had scaled down the graph by 10. Then we measured out 6 grams of our salt into a weigh-boat. We created a hot water bath using our small 10 mL beaker of water inside a larger beaker of water on the hot plate (below, left), so that the water would heat up in a more slow and controlled manner. Once the thermometer in the water bath read 44 degrees Celsius, we took out our small beaker of water, poured the salt in, and began stirring very aggressively with the stirring rod. Eventually, we realized that the salt was not going to dissolve, as shown in the photo on the right.


Since the point on the graph with our two values was below the NaNO3 and KNO3 curves but above the NaCl curve, it was apparent that our compound was in fact Sodium Chloride because the salt would have fully dissolved if it was NaNO3 or KNO3. However, we wanted to be extra sure that it was indeed NaCl, so we conducted another test. This time we heated the 10 mL of water to around 30 degrees Celsius and we measured out around 20 grams of salt and poured it in. If the we were correct that the compound was Sodium Chloride, then the salt would definitely dissolve as it was underneath the solubility curve of NaCl. Fortunately, it did dissolve! This left left us with no doubt that the our solute was NaCl. Sweet triumph :)

The dissolved NaCL :)
Proud Probe Buddies :)


Today we learned many things. We learned how to properly read a solubility curve graph, and that our first test resulted in a very saturated and incompletely dissolved NaCl solution, while our second test resulted in an unsaturated and fully dissolved solution. We learned that the solubility of a substance generally increases with the temperature (except in the case of NaCl); it is a direct relationship. It was a very fun lab. My favorite part was struggling along side my Probe Buddy, and creating memories as well as dissolved solutions. :)


Tuesday, August 4, 2015

Gas Law Lab 12

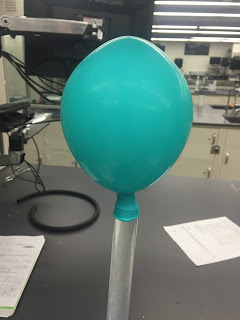
In today's episode of Lab Escapades, the Probe Buddies take on carbon dioxide emitting solutions and balloons! The goal of the lab was to collect the gas emitted from a sample of Alka Seltzer, and using the ideal gas law, we determined the mass of gas produced. First, we ground up the alka seltzer tablet using an old-fashioned mortar and pestle, and then poured it into a deflated balloon. Then we attached the balloon to a water-filled graduated cylinder, and the fun began! When the two substances mixed, an abundance of fizzing occurred, and then the balloon filled with CO2 gas emissions, until it looked like this!


After measuring the circumference of this balloon, we emptied its contents and refilled it with water until the balloon reached the same circumference as before. Then we measured this amount of water with a graduated cylinder to find the volume of the gas emitted. Once had all our collected data (shown below), we had many calculations to do using the law of ideal gases.


Analysis Questions:

  1. Experimental error may have occurred in this lab when we accidentally spilled a little bit of Alka Saltzer when we tried to put the powder into the balloon. More error probably occurred because our slightly inaccurate measuring skills in measuring the amount of water and circumference of the balloon. We could also have accidentally not correctly massed the alka seltzer with the temperamental scales.
  2. Our yield of CO2 would have been less than normal because we spilled some of the alka seltzer powder while we were pouring it into the balloon. That made our "n" number of moles of CO2 too small.
  3. circ = 35.5 cm
35.5 = 2Ï€r
5.65 = r V = (4/3)Ï€16.96 V = 755.5 mL
4. The pencil and paper calculated volume is a little over 100 mL less than the water balloon volume measurement. The physical water balloon measurement should be more accurate because our balloon was not a perfect sphere, but a warped oblong shape. The calculated volume called for a perfect sphere that we did not have in real life.
5. Two differences between real gases and ideal gases are that
  • real gases have IMFs, but ideal gases don't
  • ideal gas has no mass, but real gas does
6. The CO2 we collected would not be considered ideal. The CO2 gas contains the CO2 molecules, there are intermolecular forces because all molecules have London Dispersion Forces. We also determined the volume of the CO2 gas, and ideal gases do not have volume so we know that it is real.

Advanced Questions:

  1. The mass of CO2 that should have been collected is 2.06 grams. I found this out by using stoichiometry with the gases and by finding out that the limiting reagent is citric acid.
  2. The percent yield for the CO2 collected in our sample: 1.56g / 2.06 g x 100 = 75.73%
  3. Our calculated "n" value would be less than the actual amount of CO2 available because some of it dissolved into the water due to the high solubility around room temperature of 90 mL/100mL of water. Unfortunately, we were unable to measure the CO2 that dissolved in the balloon water.

Monday, August 3, 2015

Calories in Food 11B

You know it's a good day when you get to set fire to a cheese puff.

In today's lab, Ameera and I got to enflame several everyday food items, including a pecan, a cashew, and a cheese puff. The goal of this was to figure out how much energy was released by the food sample, and then use this data to determine how many Calories are in each sample. Some tools we used to aid us in this determination were a calorimeter, a thermometer, a beaker, some water to help measure, and a flame.

Here is the Calorimeter in which we burned the food. Notice the beaker on top filled with water that we used to measure the heat released by the sample.

Poor Cheeto.
after!
before....


Questions --

  1. We measured a temperature change in the water.
  2. We measured the energy released by the food sample.
  3. A small amount of energy is released in the form of smoke through the holes in the calorimeter.
  4. I was surprised that the pecan had the most Calories and the Cheeto had the least Calories, because Cheetos are generally looked at as really unhealthy, so i thought they would contain the most Calories.

Sunday, August 2, 2015

Evaporation and Intermolecular Attractions 10

'Twas an extremely exciting day in the lab today, because Ameera and I, the probe buddies, finally got to use a real probe!!!! It was simply monumental.

Here is our pre-lab data: Lewis dot structures, molar mass, and intermolecular attractive forces OH MY!


Here is the data we collected after using our probe to test the evaporation rates of the 5 substances above.


Calculations and Results

2.
  • Methanol's temperature went down 6.3 degrees celsius during the course of the experiment. This is a large change in temperature, which means that much of the methanol evaporated in 240 seconds compared to the other substances, so methanol has a very high vapor pressure. This also means that there are comparatively not very strong bonds in methanol -- though it has London dispersion forces and dipole-dipole IMF's like every other substance tested, it only has one hydrogen bond and less molar mass than the others, so the less strong bonds did not hold onto their electrons well enough and they were released in the form of vapor.
  • Ethanol only dropped 0.8 degrees C , which shows that it has stronger hydrogen bonds in comparison to methanol, that only allowed for a lesser vapor pressure and a lower amount of evaporation.
  • n-Butanol had a temperature drop of 1.6 degrees C during the evaporation process, which shows that it has a higher vapor pressure than ethanol, but weaker hydrogen bonds. Our data does not make much sense in this case, because n-Butanol has a more complex Lewis Dot Structure with many more bonds and a larger molar mass than ethanol, so it should have a lower vapor pressure.
  • Glycerin was the funky substance of the bunch. It actually gained 0.6 degrees C during the experiment. This demonstrates the strength of its 3 very strong hydrogen bonds in producing a very low vapor pressure and allowing the reverse process of condensation to occur. Glycerin is a very nonvolatile substance.
  • Water gained 1.6 degrees C throughout the experiment. Though it has 2 strong hydrogen bonds, it also has a very small molar mass of only 18.g in comparison to the other substances so more evaporation occurred.
3. Glycerin and n-Butanol have similar molar masses with a difference of only 17.97 g. Though their molar masses are similar, n-Butanol has far more hydrogens while glycerin has more oxygens and in turn more hydrogen bonds. This greater number of hydrogen bonds allows for little to no evaporation, while the lesser number of hydrogen bonds in n-Butanol allows more a much higher vapor pressure and more evaporation.

4. The number of -OH groups in the tested substances greatly effected the ability of each substance to evaporate. As discussed previously, more -OH groups (or hydrogen bonds) caused a lower vapor pressure and less evaporation because the electrons were bound more tightly and did not float as freely as the substances with fewer hydrogen bonds. These substances saw much more evaporation and a higher vapor pressure.


Wednesday, July 29, 2015

Flame Test Lab 7


What's even cooler than setting stuff on fire in chem class? 

Setting stuff on fire in all the colors of the rainbow, duh.


In today's lab, we got to do just that! Ameera, Zoe, and I got to light a bunch of metallic ions on fire to see the different reactions of the excited electrons and what colors were emitted by each. It was so very cool to see blazing flame in such abnormal colors, such as the emerald green, surging lavender, and even the brilliant magenta. 


my personal favorite: copper(II) chloride!

love that purple Potassium!

Lithium sure is a beaut.
And here is a slow-mo video of the blood orange Sodium for your enjoyment!


The answers to the pre-lab questions are below. 

We had two unknown metallic ions to test. We figured out that Unkown #1 was Lithium, and Unkown #2 was Potassium. By putting these unknowns in the flames, we were able to discern which metal each was. Since each excited-electron-color-emission is characteristic to each element and no two are the exact same, we matched the unknown colors to the known metal color emissions that we had tested earlier. 

probe

Tuesday, July 28, 2015

Electron Configuration Battleship 8

  Today we played a very fun game called Electron Configuration Battleship. It allowed us to use our new knowledge of electron orbitals and the set-up of the periodic table to play the classic game of Battleship. It was actually very fun, though it did take a long time to name my targets because of the long list of orbitals that I had to recite. Here's my ship set-up!


It was quite the evil placement of my tiny ship, I know. 

Though it was challenging to have to list off all the orbitals every time I wanted to name a target, it definitely brought the concept home for me of how the periodic table is oriented. All the repetition of orbitals made me sure I won't forget them again!

And just for the record, I totally beat Jason.

Monday, July 27, 2015

Mole-Mass Relationships Lab 6


Today's lab was all about putting our new knowledge of stoichiometry to the test. Given the equation NaHCO3(s) + HCl(aq) --> NaCl(aq) + CO2(g) + H2O(l), Zoe and I needed to figure out what the limiting reactant in the equation was, and discern how much salt (NaCl) would be left after the reaction occurred. We found this out using our experimental data and then checked our work using the wonderful conversion methods and moles of stoichiometry.

First, we added the sodium hydrogen carbonate (NaHCO3) to an evaporating dish.

Then we added the extremely corrosive chemical hydrochloric acid (HCl) to the mixture and watched it fizz. Next, we put in on the hot plate to aid in the chemical reaction. The hot plate caused the CO2 to bubble out and the H2O to evaporate, leaving behind the precipitate NaCl. Here's a clip of the bubbling and evaporation!


After the evaporation had finished, only one thing remained: the precipitate salt! I thought it was very cool that by mixing a bunch of chemicals, we ended up with something I could put on some french fries.


The limiting reactant was NaHCO3 because there was excess HCl, and the NaHCO3 was used up far more quickly. Here are my calculations.


The percent yield for this experiment was supposed to add up to 100%, but for some reason ours only added up to 77.93%. I believe this error is because of an accidental loss of material. At one point Zoe was accidentally spilled the substance onto the hot plate, so an amount of NaCl was lost out of the evaporating dish, so we were unable to measure that in the final product. There also might have been an error during the measuring portion due to the inaccurate balances.

Composition of a Copper Sulfate Hydrate Lab 5B

Today's second lab was very exciting. Ameera and I got to experiment with actual chemicals, and act like real chemists! Our interesting tools were the best part.

    The purpose of today's lab was to keep heating the hydrate CuSo4 .xH2O until much of the water evaporated, and the compound changed color from blue to a sky-tinted white. We needed to weigh the compound many times during the heating process to determine how the mass changed once more and more water evaporated. Then we needed to use our data once the water finished evaporating to determine the empirical formula the hydrate.

Before Heating

After Heating (on the hot plate)
    Calculations:
1. Mass of the Hydrate Used:

47.17g - 46.35g = 0.82g

2. Mass of the water lost:

47.17g - 46.63g = 0.54g

3. percentage of water in the hydrate:

.54/.82 = .6585 x 100 = 65.85%

4. Percent Error & possible explanation for error:

pe = [(65.85 - 36.0) / 36.0] x 100 = 82.92% error

I think our percent error was so high because we did not heat up our compound enough to evaporate enough water, thus we were unable to figure out the correct percentage of water in the hydrate.

5. Find the exact formula of the hydrate from the experimental data:

The photo above shows how I calculated the exact formula of the hydrate from the experimental data.  Notice the calculations for molar mass on the far right, and the conversions from grams to moles on the left. 

The empirical formula obtained from the hydrate was CuSo4 . 17H2O 

Our percent error was very high, so I predict that our coefficient on the water was much, much larger than it should have been. The accepted percent of water in the hydrate was 36%, and since ours was almost 66% water I think that we measured far too much water than there actually was in the hydrate.

Sunday, July 26, 2015

Mole Baggie Lab 5A

     Today's lab was like trying to solve a mystery. Ameera and I were given two anonymous plastic baggies filled with an unknown chemical compound. Without opening the bags, we needed to use the conversion factor method and moles to figure out what the substance inside was.
     We started off trying to determine what substance was in bag B5. It was the more difficult bag for us, because it was a multi-step equation in which we needed to first convert from molecules to moles, and then from moles to grams. After we subtracted the mass of the empty bag from the total mass in the end, we finally discovered that the substance in the bag had a molar mass of 100.25, which was closest to the compound Calcium Carbonate. And bingo! We verified the substance.
     Finding out the unknown substance in bag A4 was much easier because it was only a one-step conversion. We found out the mass of the substance in grams by using the balance and subracting the mass of the empty bag from the substance, and then converted grams to moles by division. We then found out that the molar mass was 103.75, which was again closest to Calcium Carbonate. :)

Thursday, July 23, 2015

Double Replacement Reaction Lab 4A

   Today we had a cool lab that involved mixing various compounds and seeing if a reaction occurred, forming a precipitate. Here's a photo of the well plate after a few solids formed.

    As you can see, there's a difference in color in the solution in numbers 2, 3, 11(supposed to be 4), 5, 6, and 7. This means that a reaction occurred and a solid formed in the solution. 2, 3, and 4 are a very milky and cloudy reaction, while 5,6, and 7 are a bright vibrant blue color with almost snake-like formations. What surprised me the most during this lab was how vibrantly some solutions reacted, while at the same time other solutions didn't react at all. It was very cool seeing the precipitate form.

    All the balanced chemical reactions for numbers 1-10 are written out on this piece of paper below. You can see if a reaction occurred if a solid (s) is written in the products.


Here are the net ionic equations for any chemical reaction in which the solid precipitate formed.

sorry for the limited visibility