Wednesday, July 29, 2015

Flame Test Lab 7


What's even cooler than setting stuff on fire in chem class? 

Setting stuff on fire in all the colors of the rainbow, duh.


In today's lab, we got to do just that! Ameera, Zoe, and I got to light a bunch of metallic ions on fire to see the different reactions of the excited electrons and what colors were emitted by each. It was so very cool to see blazing flame in such abnormal colors, such as the emerald green, surging lavender, and even the brilliant magenta. 


my personal favorite: copper(II) chloride!

love that purple Potassium!

Lithium sure is a beaut.
And here is a slow-mo video of the blood orange Sodium for your enjoyment!


The answers to the pre-lab questions are below. 

We had two unknown metallic ions to test. We figured out that Unkown #1 was Lithium, and Unkown #2 was Potassium. By putting these unknowns in the flames, we were able to discern which metal each was. Since each excited-electron-color-emission is characteristic to each element and no two are the exact same, we matched the unknown colors to the known metal color emissions that we had tested earlier. 

probe

Tuesday, July 28, 2015

Electron Configuration Battleship 8

  Today we played a very fun game called Electron Configuration Battleship. It allowed us to use our new knowledge of electron orbitals and the set-up of the periodic table to play the classic game of Battleship. It was actually very fun, though it did take a long time to name my targets because of the long list of orbitals that I had to recite. Here's my ship set-up!


It was quite the evil placement of my tiny ship, I know. 

Though it was challenging to have to list off all the orbitals every time I wanted to name a target, it definitely brought the concept home for me of how the periodic table is oriented. All the repetition of orbitals made me sure I won't forget them again!

And just for the record, I totally beat Jason.

Monday, July 27, 2015

Mole-Mass Relationships Lab 6


Today's lab was all about putting our new knowledge of stoichiometry to the test. Given the equation NaHCO3(s) + HCl(aq) --> NaCl(aq) + CO2(g) + H2O(l), Zoe and I needed to figure out what the limiting reactant in the equation was, and discern how much salt (NaCl) would be left after the reaction occurred. We found this out using our experimental data and then checked our work using the wonderful conversion methods and moles of stoichiometry.

First, we added the sodium hydrogen carbonate (NaHCO3) to an evaporating dish.

Then we added the extremely corrosive chemical hydrochloric acid (HCl) to the mixture and watched it fizz. Next, we put in on the hot plate to aid in the chemical reaction. The hot plate caused the CO2 to bubble out and the H2O to evaporate, leaving behind the precipitate NaCl. Here's a clip of the bubbling and evaporation!


After the evaporation had finished, only one thing remained: the precipitate salt! I thought it was very cool that by mixing a bunch of chemicals, we ended up with something I could put on some french fries.


The limiting reactant was NaHCO3 because there was excess HCl, and the NaHCO3 was used up far more quickly. Here are my calculations.


The percent yield for this experiment was supposed to add up to 100%, but for some reason ours only added up to 77.93%. I believe this error is because of an accidental loss of material. At one point Zoe was accidentally spilled the substance onto the hot plate, so an amount of NaCl was lost out of the evaporating dish, so we were unable to measure that in the final product. There also might have been an error during the measuring portion due to the inaccurate balances.

Composition of a Copper Sulfate Hydrate Lab 5B

Today's second lab was very exciting. Ameera and I got to experiment with actual chemicals, and act like real chemists! Our interesting tools were the best part.

    The purpose of today's lab was to keep heating the hydrate CuSo4 .xH2O until much of the water evaporated, and the compound changed color from blue to a sky-tinted white. We needed to weigh the compound many times during the heating process to determine how the mass changed once more and more water evaporated. Then we needed to use our data once the water finished evaporating to determine the empirical formula the hydrate.

Before Heating

After Heating (on the hot plate)
    Calculations:
1. Mass of the Hydrate Used:

47.17g - 46.35g = 0.82g

2. Mass of the water lost:

47.17g - 46.63g = 0.54g

3. percentage of water in the hydrate:

.54/.82 = .6585 x 100 = 65.85%

4. Percent Error & possible explanation for error:

pe = [(65.85 - 36.0) / 36.0] x 100 = 82.92% error

I think our percent error was so high because we did not heat up our compound enough to evaporate enough water, thus we were unable to figure out the correct percentage of water in the hydrate.

5. Find the exact formula of the hydrate from the experimental data:

The photo above shows how I calculated the exact formula of the hydrate from the experimental data.  Notice the calculations for molar mass on the far right, and the conversions from grams to moles on the left. 

The empirical formula obtained from the hydrate was CuSo4 . 17H2O 

Our percent error was very high, so I predict that our coefficient on the water was much, much larger than it should have been. The accepted percent of water in the hydrate was 36%, and since ours was almost 66% water I think that we measured far too much water than there actually was in the hydrate.

Sunday, July 26, 2015

Mole Baggie Lab 5A

     Today's lab was like trying to solve a mystery. Ameera and I were given two anonymous plastic baggies filled with an unknown chemical compound. Without opening the bags, we needed to use the conversion factor method and moles to figure out what the substance inside was.
     We started off trying to determine what substance was in bag B5. It was the more difficult bag for us, because it was a multi-step equation in which we needed to first convert from molecules to moles, and then from moles to grams. After we subtracted the mass of the empty bag from the total mass in the end, we finally discovered that the substance in the bag had a molar mass of 100.25, which was closest to the compound Calcium Carbonate. And bingo! We verified the substance.
     Finding out the unknown substance in bag A4 was much easier because it was only a one-step conversion. We found out the mass of the substance in grams by using the balance and subracting the mass of the empty bag from the substance, and then converted grams to moles by division. We then found out that the molar mass was 103.75, which was again closest to Calcium Carbonate. :)

Thursday, July 23, 2015

Double Replacement Reaction Lab 4A

   Today we had a cool lab that involved mixing various compounds and seeing if a reaction occurred, forming a precipitate. Here's a photo of the well plate after a few solids formed.

    As you can see, there's a difference in color in the solution in numbers 2, 3, 11(supposed to be 4), 5, 6, and 7. This means that a reaction occurred and a solid formed in the solution. 2, 3, and 4 are a very milky and cloudy reaction, while 5,6, and 7 are a bright vibrant blue color with almost snake-like formations. What surprised me the most during this lab was how vibrantly some solutions reacted, while at the same time other solutions didn't react at all. It was very cool seeing the precipitate form.

    All the balanced chemical reactions for numbers 1-10 are written out on this piece of paper below. You can see if a reaction occurred if a solid (s) is written in the products.


Here are the net ionic equations for any chemical reaction in which the solid precipitate formed.

sorry for the limited visibility


Wednesday, July 22, 2015

Nomenclature Puzzle 3

     Today we did a fun puzzle lab. We were given 64 triangles with the names of different binary ionic compounds, covalent compounds, and polyatomic ionic compounds as well as their formulas. They were all mixed up into every different triangle like puzzle pieces! Reshma, Meghana and I had to match up each chemical name with its respective formula, until we formed a perfect square and thus completed the puzzle. In about 45 minutes, our puzzle went from looking like this....

 to this!!


    Finding all the right matches and trying to complete the puzzle was super hectic, and there were times when it seemed impossible. The biggest challenge was definitely trying to find the right match to a given formula or name in the crazy jumble of triangles! The worst was when we finally found a formula we were looking for to match a name, but when we finally found that formula we ended up losing the name somehow! 
     It was super rewarding when we finally completed the puzzle. I think my biggest contribution to the group was connecting all the bromines together in the beginning, which really helped to start everything off. I'm so proud of our group for completing this puzzle!

Tuesday, July 21, 2015

Atomic Mass of Candium (Candy-YUM!) 2B

      Ahhhh, candium. The tastiest element.
      The purpose of today's lab was to divide the candium elements into their respective isotopes -- regular, peanut, and pretzel, and then find the average atomic mass of a single element of candium, or one M&M.

Steve & I's finally average atomic mass for candium was 1.7 grams.

  1. We asked Leila and Reshma what their average atomic mass was -- 1.4 grams. Our average atomic mass numbers are vary because our two groups have different data. Steve and I have a different number of M&M's as well as different sizes, and we also could have more or less isotopes. All of which could affect and change our average atomic mass (aam).
  2. If larger samples of candium were used, the difference between our aam would become smaller than the other group's aam for the simple reason of a larger sample size equating less variation in mass. There is a larger chance in a bigger sample of the candium being close to a uniform aam.
  3. Any random piece of candium from our sample would most likely not have the same average atomic mass that we calculated. This is because aam depends on all the varied masses of our candies all averaged together, also taking into account the abundance of the 3 isotopes. For example, the regular isotope is more likely than the peanut or pretzel isotopes to be closer to the overall aam, but any random sample will not have the same mass as the aam.

Chromatography 2A

      Today my lab partner Steve and I got to dabble in the art of Chromatography. Here's some of our finished chromatograms!


     It was super fun to see a bunch of black ink turn into a beautiful rainbow of color.

  1. It's important that only the wick and not the filler paper circle be in contact with the water in the cup because in order for the solvent (water) to adsorb through the filter paper and separate the "black" ink mixture into an array of color, it must seep through very slowly though capillary action. The only way capillary action can occur is if the water spreads outwards from a point; it won't happen if the whole paper is saturated at once.
  2. The pattern of colors produced on the filter paper is affected by different variables, such as the different pens used (different mixtures of color in each), the varied properties of the components of the mixture (some will be more adsorbed into the paper, and some more adsorbed into the solvent), and the length of time the wick is spent in the water.
  3. Each ink separates into different pigment bands because, like many other materials in nature, the ink is a mixture made up of a rainbow of other colors that, when acted upon by the solvent of water, will become separated and spread into different pigment bands.
  4. The blue pigment is present in multiple different pens, and I believe that it is same in the different pens because in each chromatogram, the same vibrant, aqua blue color is present right on the edge of the design. The blue must be the same in each pen because of the similar location and shade every time. 
  5. Solely water-soluable pens and markers are used in this activity because the solvent we used to separate the ink mixtures was water. If the ink we used was not water-soluable, like the squiggles that stayed black in the photo above, the inks did not adhere to the water and spread out, thus defeating the purpose of a cladogram. in order to modify the experiment to be able to separate pigments in permanent marker, we could use a different solvent that separates permanent inks such as alcohol. 


Monday, July 20, 2015

Aluminum Foil Lab 1B

Determining the Thickness of Aluminum Foil

      How does one determine the thickness of Aluminum Foil? My lab partner Jason and I decided to use the formula D = M/LWH to figure it out, given that V = LWH. We first figured out the density of aluminum by using water displacement to find the volume, and a balance to find the mass of a piece of aluminum. 


We then figured the density to be 2.59 g/cm^3.

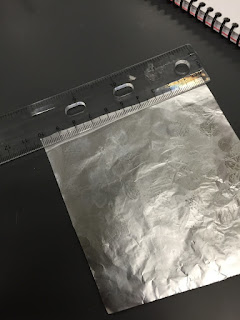
  Next, we measured all sides of the aluminum foil, and since it wasn't a perfect square and the lengths and widths varied, we found the mean of each length and width, then multiplied them into the equation with H.


We found the mass of the aluminum foil using a balance, and it turned out to be 0.3 g. Then we plugged the mass and density into the equation above, until the only unknown was the height, or thickness, of the foil, and then solved for the height.

sorry for the messiness
  And that is how I found the thickness of aluminum foil to be approximately .0113 mm!

Density Block Lab 1A

Introduction:

        In this lab, we needed to figure out the mass of a clear plastic block using its density and volume. Density is the relative heaviness of objects, measured in units of mass. The equation to find density is D=M/V, but to find the mass of the block we used the formula M=DV. My lab partner Jason and I used a ruler and the proper sig figs to measure the length, width, and height of the block to find the volume, then used the density to calculate the mass of the block.

Procedure:

        First things first, Jason and I needed to find the volume of the plastic block. To do this, we each found the length, width, and height 6 times, going every other.

 We put all our data into this spreadsheet!

      Notice how each time we measured the data, it turned out different. Because of this, we found the average of all the tries of the width, length, and height and multiplied it all out to get the volume.  Once we had the volume, we plugged it into the formula to find mass, along with the density which was given to us. Then finally we achieved mass! Yay!

Data:

      Most of our measurement data can be viewed on the table above. We found the final average volume of the block by multiplying 7.09 cm x 9.60 cm x 1.20 cm = 81.68 cm^3. The given density was 1.18 g/cm^3, so by using the M = DV formula we found the density to be 96.38 g. That's only a 0.43% error from the actual mass of 96.8 g! 

Conclusion:

      Jason and I definitely fulfilled the purpose of the lab. We found the mass of the block by measuring it and using our knowledge of the formulas. There was room for possible error regarding the discrepancies in measuring using the ruler, but we fixed that by measuring each side multiple times and averaging our findings. I learned to always gather as much data as possible during an experiment to make the result as accurate as possible. I'll also have to be more careful measuring during future labs!